We've all experienced it before: you're deep into your beauty rest, catching some Zs, when someone storms into your room to wake you up.
Growing up, it's your siblings.
In college, it's your dorm mates.
In adulthood, it's your children.
A good night's sleep is a vital for every person of every age, so we became inspired to create a product to help facilitate its success.
For the manufacturing of the Sleep Switch, we chose to use acrylic and 3D printing processes, secured by very sturdy hardware to ensure the durability of the piece.
For the manufacturing of the Sleep Switch, we chose to use acrylic and 3D printing processes, secured by very sturdy hardware to ensure the durability of the piece.
ME102 FINAL PROJECT-THE SLEEP SWITCH
CHLOE HUANG & SPENCER HANSON
RAPID PROTOTYPE 1

[thought process]
This was our very first rapid prototype. Going into Room 36, we knew we wanted to create a switch-like mechanism, but did not have a clear-cut vision. Specifically, we had a hard time visualizing how we would incorporate the spring. So, both of us being visual people, we decided to try making a very rapid and rough version of an idea we had for a mechanism that moves side to side. We used cardboard, rubber bands and wooden pegs to execute this vision.
[takeaways ]
This mechanism, though it did not incorporate a vision for a spring, was quite functional. It moved pretty successfully side to side, but it did not quite align with our vision of creating a switch. We were looking for a wider range of motion, so decided to continue exploring other ideas for our bistable mechanism.

RAPID PROTOTYPE 2


RAPID PROTOTYPE 1
[thought process ]
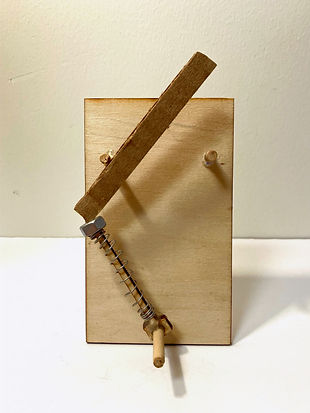
This was our second rapid prototype. It modeled the format of the switch-based bistable mechanism that we ended up creating for our final project. We laser cut the back plate and spring shaft, while using wooden pegs for what became shoulder screws, cardboard for the lever, and a simple nut for the washer, and this time incorporated a spring. The idea behind the two pegs on either side was to prevent the handle from going too far off, we wanted to be in control of where the lever would end up.
[takeaways ]
We learned a lot through this rapid prototype. It was our first shot at truly visualizing the mechanism that we were to make. We figured out where the spring would go, as well as how the bistability would be driven. When bringing this model to the coaching session, we learned that the key component that would make this mechanism successful is the relationship between the spring shaft, the lever, and the spring. We would need to cut a slit into the spring shaft (which, at this stage, was extremely thin and fragile) so that the lever could be attached within the slit for smooth up-and-down movement potential. The main dilemma we would face here is creating a shaft that was thick enough to have a slit in between—while not compromising durability—while still remaining small enough so that a compression spring could fit over it.
FUNCTIONAL PROTOTYPE

[thought process ]
For this prototype, we got a lot closer to what the final product would be. We created a Solidworks assembly, then proceeded to laser cut most parts. We laser cut a base, as well as two back supports, two levers with a peg in the middle that would move up and down the spring shaft, with a washer and spring above it. We continued to use wooden pegs as rotational support.
We had a little trouble putting this prototype together, as the Solidworks took much longer than we thought, but even after everything came together in the assembly, it still did not dimension correctly, so we had to make quick adjustments on Illustrator on the spot.
[takeaways ]
The coaching session that followed this prototype was extremely beneficial to our understanding of how to transition this version of the product into our final project. This prototype did not end up being functional for 2 reasons: we had drilled the hole too high for the lever to force the bistability, and our compression spring was way too stiff. This became an issue for us, as we had bought about 7 springs at ACE the day before, and this was the only one that fit over our slit. But, the reassuring news was that if we made those fixes to our project, this mechanism would work. We learned that the wooden pegs would not be strong enough to handle the mechanism, so learned about shoulder screws (and bushings to increase rigidity), and discussed the pieces we were going to laser cut.
FINAL STAGES


[thought process ]
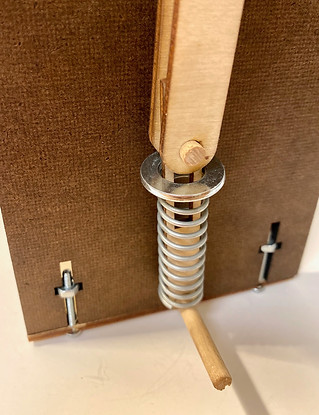
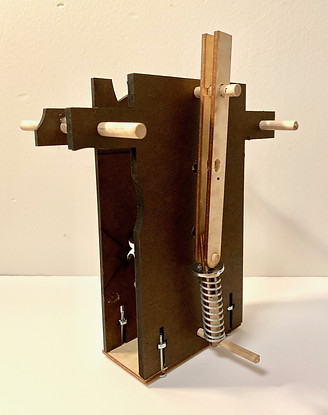
In the pictures above, we were reaching the final stages of the creation of our mechanism. We temporarily laser cut a smaller version of our back support piece just to get a better idea of whether or not all of our 3D printed pieces would work, and whether the mechanism would all come together and function. We also used to it make sure that all of our measurements for where the shoulder screws would go were in the right place.
[takeaways ]
We're very glad that we took this half-step before making the very final version of this product. The simplicity of the back plate allowed us to quickly make adjustments when needed. For example, with the 3D printer, we realized that we should have slightly underestimated the measurements, instead of making them exact, as, unlike the laser cutter, the 3D printer truly prints it at exactly that measurement, and the pieces had to be sanded down to fit in with each other smoothly. Another thing that we learned from this process was that the supporting "Y" piece of the mechanism was not necessary. It was something that we were back-and-forth with throughout the process, as well as something we brought up during coaching, but we decided to run the print anyways just in case. Once we confirmed that it was unnecessary, we eliminated the piece from our prototype.